Upcycle Tin Cans into DIY Napkin Rings
We love using cloth napkins at our dinner table but, instead of buying cheap napkin rings, we decided to DIY napkin rings using upcycled tin cans and IOD moulds.

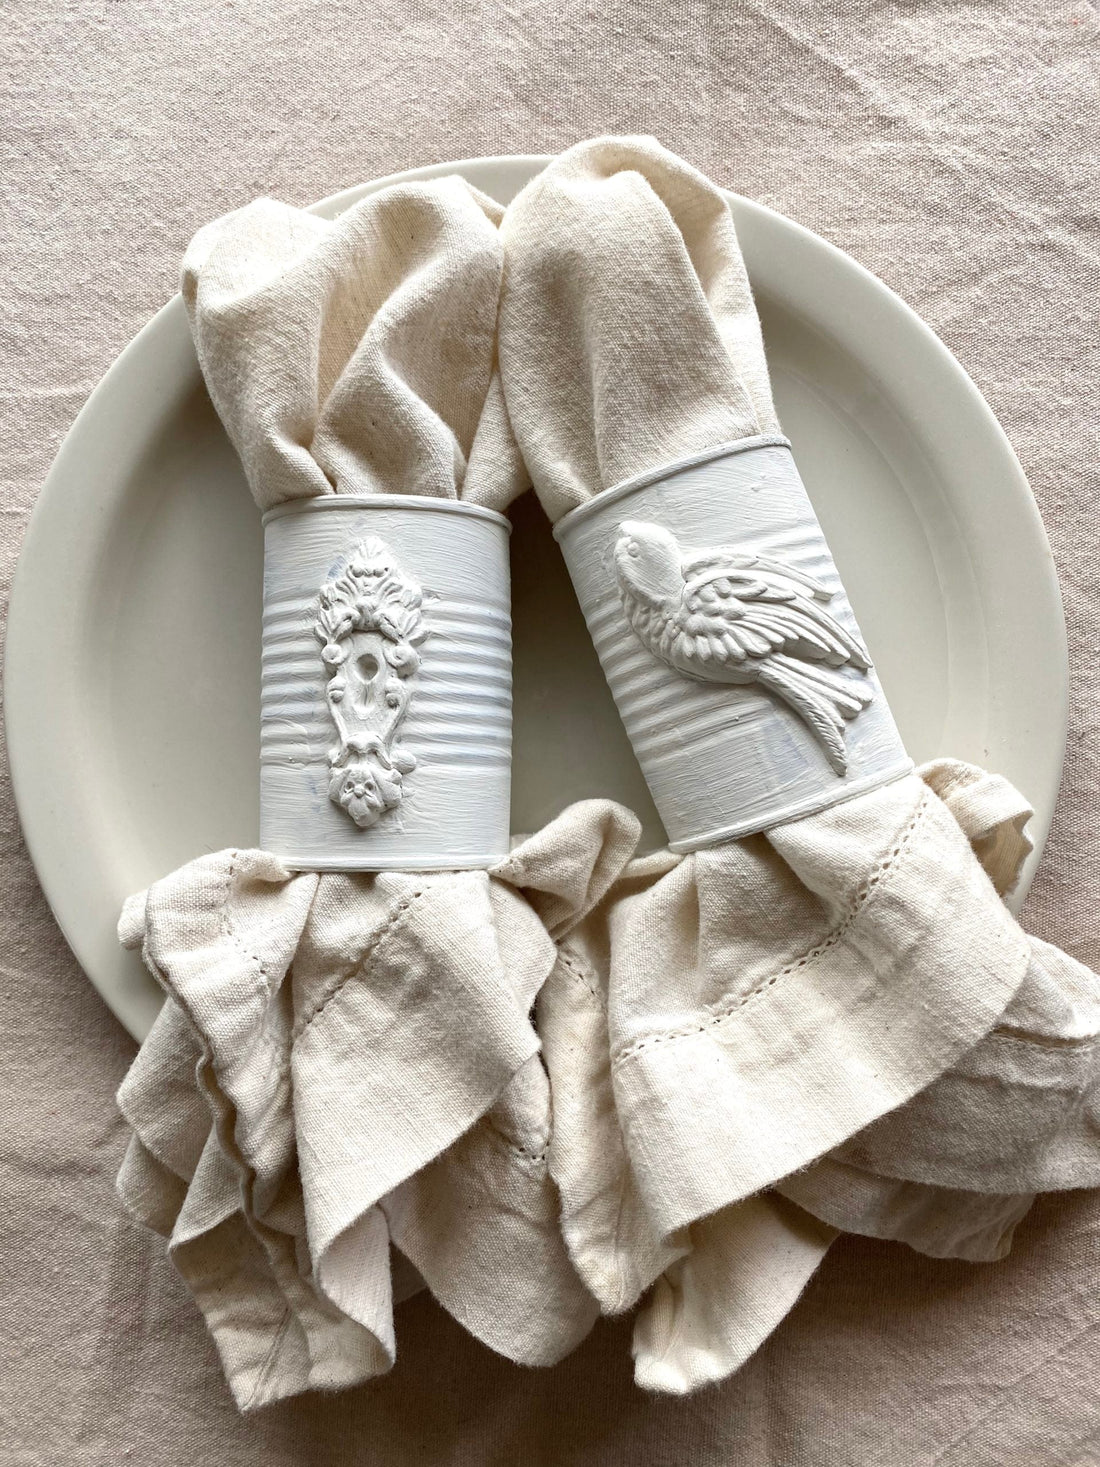
You don’t have to wait for the holidays to do this DIY napkin ring idea. With the Birdsong mould, these napkin cuffs make a gorgeous compliment to any spring table. Want something a little fancier? Dress up your homemade napkin rings with the Lock & Key mould for a more vintage, Victorian look.
(Wouldn’t these just be darling for DIY wedding napkin rings?)
This is a quick and easy DIY decor project that’s perfect as a beginner craft or for when you have an extra hour to get creative.
No time now? Click here to pin this project for later.
Check out the step-by-step video tutorial below with Josie or keep reading for a complete supply list and instructions.
Supplies Needed to Upcycle Tin Cans into DIY Napkin Rings
(Disclosure: This post contains affiliate links.)
- 2+ Clean, empty 6 oz tin cans, labels peeled and glue washed off
- IOD Birdsong Mould – Find a stockist near you
- IOD Lock & Key Mould – Find a stockist near you
- IOD Air Dry Clay – Find a stockist near you
- Your favorite mineral-based or chalk type paint in antique white
- Cornstarch
- Soft paint brush
- Sanding block (medium or coarse grit)
- Smooth edge can opener
- Titebond Quick and Thick glue
- Spatula spreader for glue
- Your favorite matte sealer of choice
How to Make Your Own Napkin Cuffs from Upcycle Tin Cans
DIY Napkin Rings for Any Occasion in 13 Easy Steps
-
Prepare the tin cans.
Using a smooth edge can opener, cut both the bottom and the top off a 6 oz tin can. (In our family, these are usually tomato paste cans.) It’s important to use a smooth edge can opener because it nicely crimps the metal and prevents sharp edges.

-
Decide which side of the tin can is going to the top of the napkin cuff and reshape the can into an oval.
With the heels of both your hands, gently push down on the can to bend it into an oval shape. This will keep your project from rolling around when you’re working and it will also give you a nice surface area to create on.

-
Prepare the mould.
Using your Birdsong mould, lightly brush a bit of cornstarch in the mould cavity you want to use. This dusting of powder will help the clay release easily from the mould and prevent any distortion.

-
Push the clay into the mould cavity.
Estimate how much clay is needed to fill the cavity and pull that amount off from the block of IOD Air Dry Clay. Roll the clay in your hands for a moment to warm it up. This will make the air dry clay extra soft and easy to push into the mould cavity.

-
Remove the excess clay.
Use your thumb to pull off the excess clay and reveal the micro rim. Normally, you level the clay surface to create a flat backside. However, for this project, you need to scoop out a bit of air dry clay from the center of the casting. This will create a concave surface where the back of the casting looks dented in. This is so that the casting has a lower profile on the napkin cuff.

-
Release the casting from the mould.
Flip the entire mould over on a flat surface and then fold it back to release the casting without any pulling.

-
Sand the project surface.
Take a medium or coarse grit sanding block, sand the inside top and bottom rims of the can to make sure there’s no sharp edges. Then rub the sandpaper all over the exterior of the can.
This will rough up the metal surface and give it a little “tooth.” This means that the rough surface gives glue and paint something to grab on to.
-
Figure out where you want to place your casting.
Take a moment to lay the casting on the project where you think you want it to go. This is your chance to try a few different possibilities and choose the one you like best.

-
Apply the glue to the backside of the casting.
Pick up the casting you made and squeeze some glue along the back. Using a small spatula or wooden craft stick, spread the glue so that it completely covers the backside of the casting. Make sure the glue goes all the way to the edges of the casting.

-
Place the casting with the glue side down and gently press to adhere it to the tin can surface.
Place the casting on the surface of the tin can where you want it. Then gently press down on the entire casting being careful not to squish the design. This creates an even and consistent bed of glue that maximizes adhesion between the casting and the tin can. Take special care to press the edges down as part of this step.
Don’t worry if a little extra glue squishes out – you can just wipe it a way with a finger or brush.
-
Allow your air dry clay castings to dry.
Ideally, you want to let the air dry clay harden for 24 hours before painting. But if you’re in a rush, set your napkin cuffs in front of a fan for a few minutes. This allows a crust to form on the casting and helps preserve the details of the design when you paint.
-
Paint your napkin cuffs.
Begin applying a chalk type or mineral based antique white paint to the surface of your project. If you only allowed a few minutes for the clay to dry, make sure you use a soft brush when you paint so that you don’t accidentally damage or distort the detail.
Painting tips:
– Make sure you don’t use too much paint as it will pool in parts of the design and obscure the detail.
– Sometimes it takes a couple of coats of paint to get good coverage on the metal surface.
– After everything dries, you will likely have some gaps and cracks as the air dry clay shrinks while drying. You can easily touch them up with another coat of paint.
-
Leave your homemade napkin cuffs to fully dry.
Set your upcycle tin can napkin rings upright so they are vertical while drying. Plan to let them dry overnight and then seal your work with a matte sealer of choice.
Upcycle tin can projects are so easy and fun. You can use them to make planters, pencil holders, or festive luminaries. We’ve even used the lids to make holiday ornaments!
Here are some more ideas for how you can upcycle tin cans with IOD.
Make these planters with Jami Ray Vintage.

Watch this video to see how to DIY tin can luminaries. While this video shows tin can lanterns for use during the holidays, wouldn’t these create great ambiance for you next party on the patio?

Can you believe the ornament below is a tin can lid? Learn how to make it here.

Have you used upcycled tin cans to make something beautiful? Show us on social media – we’d love to see!
 ×
×