DIY Garden Stakes with IOD Moulds - Vintage Style!

Hey IOD Fam! Today we're off on a label-making adventure—vintage style!
Whether you're decking out your garden with bespoke labels or jazzing up the spice jars in your kitchen, this tutorial is just the ticket. And yep, this is only the beginning—we’ve got a two-part series ready for you, to create complimentary upcycled tins. But this label project stands well on it's own too! By the end of this, you might just be looking for excuses to label all the things!
Here’s how you can create your own vintage labels using IOD moulds to personalize your space and garden:
Step 1
Take out your IOD Conservatory Moulds and your Amazing Casting Resin. Select which of the labels will best fit the font you want to use from the Apothecary Labels Stamp set. Use a 1 to 1 ratio for parts A and B, and mix well. Remember that there are guides right on your moulds to tell you how much you need to fill each cavity. We use a regular kitchen scale and a calculator so we have less waste. Game changer! Allow to cure.
Step 2
While still slightly warm, remove from the mould. Confession—our nail was too small. You want to look at the size of your metal stake and choose a nail closer to that size. Use a hammer to make a hole. We find this easier than trying to create a hole during the cure, because then you have to hold it steady until its dry enough to support the weight. Remove the nail, and smooth out your label if it bent at all during the process. If it’s still warm, this should be simple enough.
Step 3
Paint your labels. We chose a classic black chalk paint and did two coats for full coverage. Allow to dry thoroughly.
Step 4
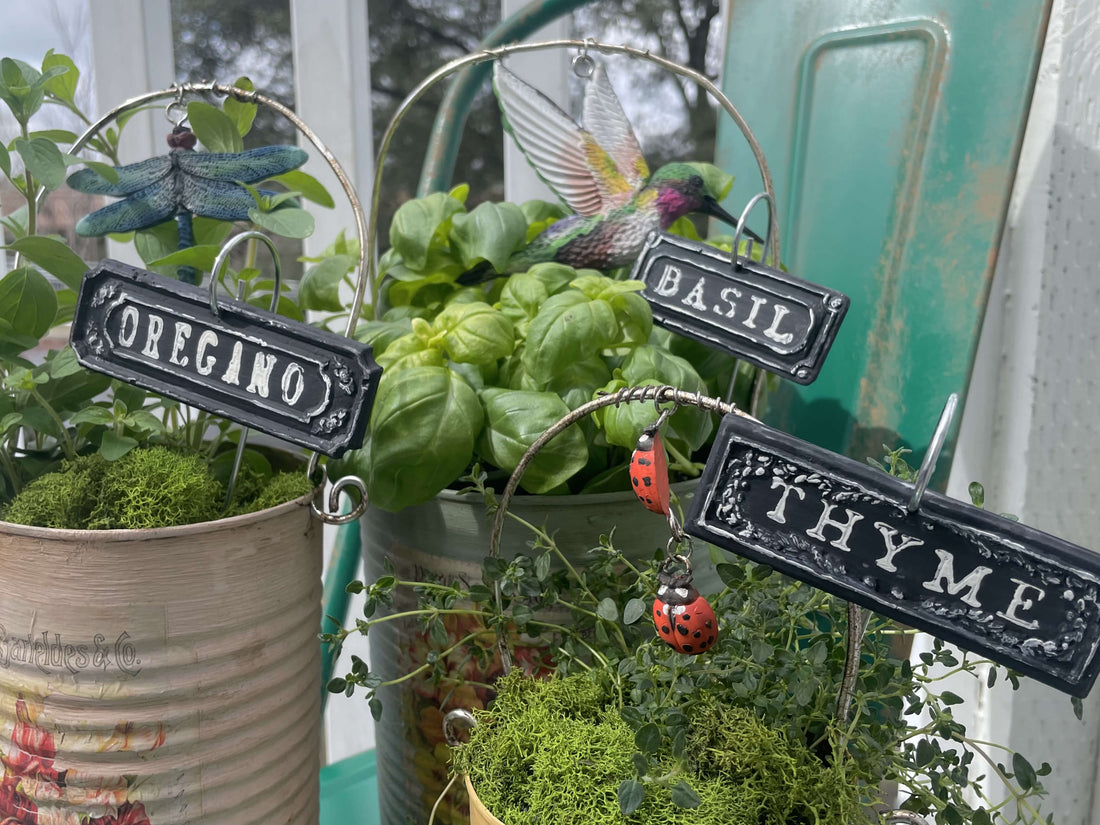
We find that the Apothecary Labels do great using their own plastic cover sheets as a mini thin mount. You don’t have the great gridded lines, but they sure are convenient! We decided on labels for the herb garden, so Basil, Oregano, and Thyme. Arrange your letters on your “thin mount” and use your brayer and a dollop of white chalk paint, smooth paint gently onto your letters. Hover briefly to be sure of your alignment, then commit! Press down evenly, but when you’re using paint instead of ink, you don’t want to go so hard that you lose definition. Just enough for a clean application. Do all your labels and allow to dry.

Step 5
Using that same white chalk paint and a small artist brush, gently go over the highlights on your mould to bring out all the little details. It really makes a big difference. Allow to dry.
Step 6
Use an exterior sealer. We use General Finishes, but check with your stockiest to see if they can recommend something that can hold up to the outdoors. Dry.
Step 7
Hook your labels onto the metal stakes and dunzo!
Grab your IOD products and supplies by using the store locator and finding a stockist near you.
IOD Products Needed:
Other Supplies:
- Amazing Casting Resin
- Nail/Hammer
- Black Chalk Paint*
- White Chalk Paint*
- Sealer (General Finishes Exterior 450)
- Garden Label Plant Stakes
*we used a chalk-type paint in this tutorial, but there are many brands and types of paint, talk to your stockist to learn which one is right for you!

If you're just kicking off your creative journey, have no fear — our Product 101 pages are packed with straightforward techniques to set you up for success. We're thrilled to accompany you as you explore and create. For more how-tos and creative inspo, make sure to browse through the rest of our blog.
Once you've crafted your final piece, share it with our Facebook Creative Tribe! This community is not just a showcase but also a supportive hub for when you hit those creative roadblocks. And remember, your local stockist is always ready to assist with IOD supplies and expert advice. We're excited to see what you'll bring to life!
 ×
×