4 Easy Fall Table Decor Ideas with IOD

If you’re in need of inspiration for your Fall or Thanksgiving table settings, look no further! We’re highlighting a selection of our favorite fall essentials that are sure to captivate. These timeless classics aren’t just beautiful for your table, but they’re also straightforward and easy to create. Even beginners can undertake these projects to elevate their table decor this year.
Oak Leaf Table Chargers


Leslie Saeta, our friend from My 100 Year Old Home, is a true expert in home decor. She’s crafted some incredibly beautiful table chargers that we’re confident you’ll adore. They are surprisingly simple to make, and look so impactful, especially once layered with your favorite fall plates.
Don’t forget to follow Leslie on social media for a wealth of fabulous home management and decoration tips. It’s always delightful to see her creations with IOD products.
IOD Products Needed:
Other Supplies:
🎨 Glue
🎨 Paint
🎨 Paint Brush
🎨 Sealer
🎨 Charger Plates
For the full step-by-step tutorial, visit Leslie’s blog using the button below.
Easy-to-Make Napkin Rings

Sally & Josie show you some easy-to-make napkin rings with the IOD trimmings mould. As they create, the sisters talk about “Choosing Your Portion” and give you some practical strategies for managing holiday stressors so you can keep your peace this holiday season.
IOD Products Needed:
Other Supplies:
🎨 Cast Resin
🎨 Scissor
🎨 Biscuit Cutter or Cookie Cutter
🎨 Paint
🎨 White Wax
In the video, Sally mentions an additional short tutorial for creating a reel for a napkin ring tutorial using the IOD Olive Crest Mould. You can find this short tutorial over on our Instagram, which you can watch by clicking here.

Pumpkin Harvest Centerpiece Box

Last week, Olivia, Sally’s daughter, joined the IOD team to craft a stunning centerpiece using the Hello Pumpkin Mould. What’s great about this project is its simplicity, making it perfect for those last-minute decor needs (not that anyone here is a procrastinator, of course!).
You can use almost any wooden box for this project – even an old drawer would look adorable.
After assembling your centerpiece, you can fill it with either flowers or pumpkins. To give it more volume without needing too much filler, consider placing some newspaper at the bottom of your centerpiece. It’s an easy trick to make everything look fuller and more vibrant.
IOD Products Needed:
✨ Stamp Pad
Other Supplies:
🎨 Centerpiece Box (you can thrift one, or even consider using an old drawer)
🎨 Chalk or Mineral Paint in Off-White
🎨 Paint Brush
🎨 Clear Wax
🎨 Dark Wax
🎨 Wax Brush
🎨 Towel (for wiping away wax)
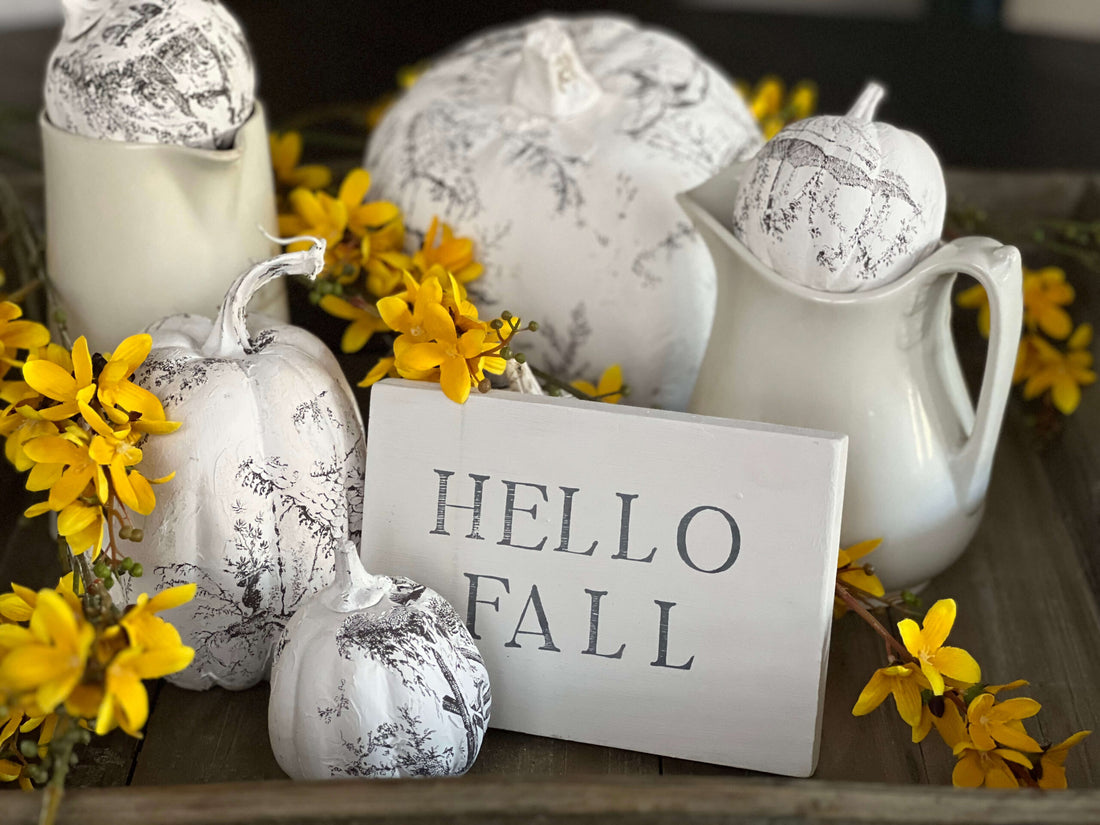
IOD Inlay Pumpkins

Alright, these little cottage core darlin’s are perfect for table decor. You can fill up your tray or centerpiece if you choose small foam or paper mache pumpkins sized for your box dimensions. We especially love how they compliment any color scheme – neutrals for the win!!
Another fun aspect of this tutorial is that you will learn how to apply inlays to round surfaces, which is a technique you can use on future projects.
Don’t forget to seal your beautiful project! Because paint inlays are proprietary paint and reactivated with water, this is an important step. You can either use spray on sealer or use a brush – if you do this though, make sure to set it first by spritzing on 50/50 polyurethane and water so you don’t smudge the paint!
IOD Products Used:
Other Supplies:
🎨 Plastic Pumpkins
🎨 Paint
🎨 Paint Brush
🎨 Scissor
🎨 Misting Bottle
If you’re just kicking off your creative journey, have no fear — our Product 101 pages are packed with straightforward techniques to set you up for success. We’re thrilled to accompany you as you explore and create. For more how-tos and creative inspo, make sure to browse through the rest of our blog.
Once you’ve crafted your final piece, share it with our Facebook Creative Tribe! This community is not just a showcase but also a supportive hub for when you hit those creative roadblocks. And remember, your local stockist is always ready to assist with IOD supplies and expert advice. We’re excited to see what you’ll bring to life!
 ×
×

DIY Christmas: Create Stunning Fairy Ornam...
Pin this article to save for later Looking for the perfect touch of elegance to adorn your tree or a wonderful handcrafted gift this season? This elegant Christmas fairy ornament is sure to delight, and...

DIY Terracotta Bauble Ornaments with IOD M...
Pin this article to save for later We have a fun one for you today! We made these lovely terracotta bauble ornaments that are going to be perfect for a vintage touch on your Christmas...